modsView
Target Visualization and Guide Star Selection Tool
Version: v2.1.7 - 2019 Nov 24
Contents
modsView is a python script for visualizing the MODS target acquisition
scripts (.acq or .img files). It uses
SAOImage DS9 to display a
Digitized Sky Survey (DSS) image of the target field with a graphical
overlay of the MODS focal plane showing the science and patrol fields,
and labeling the positions of USNO NOMAD1 catalog stars in the field with
their R-band magnitudes. This focal-plane view can be exported as a
PNG image to be used as a finding chart for your observing program.
In addition to using DSS images, you can use a FITS image of
the field provided it has a valid world coordinate system (WCS) with a
precise astrometric solution in its image header.
modsView will draw the outlines of the slits for the MODS facility long-slit
masks, and it can overlay multi-object mask slit locations by loading in
a valid MODS mask design (MMS) file with the --mms
option.
The primary use of modsView is to verify target acquisition scripts
(.acq or .img files) created using the
modsTools package. It will
verify that the selected guide star is within the guide patrol
field after the telescope preset, and after any offsets requested as part of the target
acquisition (e.g., for blind offsets to a faint target).
You can also display the approximate region of the guide
probe's shadow to see if the choice of guide stars is occulting any of
the slits.
To assist in selecting guide stars, the --find
option will print a list of candidate guide stars that satisfy the
magnitude limits and patrol field constraints for the current pointing
(including any offsets).
modsView and its companion luciView
are designed to help LBT users, on-site observers, and LBTO support
astronomers validate MODS and LUCI target acquisition scripts before attempting
execution, or to help debug problems after the fact (i.e., after someone
uploads an unverified acquisition script, or edits one on the fly). Copies
of modsView and luciView have been installed on the LBTO mountain-top observing
computers.
This webpage describes how to download, install, and use modsView.
Clicking on the screenshots will show a full-size version of the
figure.
- Note:
- modsView is now the preferred way to select and verify guide stars
for MODS target acquisition, replacing the
lbtView program. lbtView will
be phased out entirely in June 2013, and support/development was
halted in January 2013. lbtView users should migrate to modsView
and the companion luciView
programs.
With the start of routine binocular operations in Semester 2016B, we have
updated the wavefront sensor pickoff optics in MODS1 so that it is the same
as in MODS2 (i.e., a full-frame pickoff with the guide star centered in
the guider field-of-view instead of offset). As a result, starting with
Semester 2016B, there is no practical difference between MODS1 and MODS2
with regards setup and guidestar selection.
- You must update to version 2.1 (or later) from older versions of modsView
before preparing scripts for MODS after October 2016.
If you are re-using MODS1 scripts from before semester 2016B, you should
check these scripts with the new modsView, as the change in the WFS pickoff
optics means that the guide probe shadow has changed relative to the guide
star, and older scripts that had guidestars that were close to but did not
occult the slits may now block the slit.
modsView is written in Python, and has been tested with Python v2.6
and v2.7 (CentOS 6.2 and 6.3, and Mac OSX Lion thru High Sierra). The
latest version will work on Python 3 (v3.6.5), tested using
the the Anaconda distro on MacOS 10.13 (High Sierra), but as always
with MacOS your mileage may vary.
You need to have the SAOImage DS9 display program and X Public Access
(XPA) packages installed on your system:
- SAOImage DS9 and XPA
We have tested modsView with DS9 v7.1 and XPA v2.1.14. It is known to
work as far back as DS9 v6.2 and XPA v2.1.10, but you are advised to
update to the most recent versions, except DS9 v7.2 which has known
bugs and should be avoided until v7.3 or later is released.
MacOS: App vs. X?
If you are installing modsView on a MacOS system, you must install the X version
of ds9 as a standalone program, not the App version (i.e., the X icon version on the ds9
download page, not the shiny blue apple icon).
Reports are that ds9 v8.0 has problems running in standalone (non-app) mode, especially
on MacOS Mojave (aka 10.14) systems. Mojave made a major change in how programs are
installed on MacOS, and you have to install ds9 as a non-app personal executable not
a system-installed app to ensure it will work (even then, bets are off). We advise
waiting until at least ds9 Version 8.1 before upgrading. Mojave has been nothing but
trouble for early adopters, and for anybody running anything except code originating
from Apple.
pyds9
You also need to install the pyds9 Python module on your system:
- pyds9
To date we have tested modsView with pyds9 up through v1.7. When v1.7
migrated from SAO to github, there was a change in the module name, which
the modsView v2.1.1 patch addresses.
See the Release Notes for what is new in the
current version of modsView.
If you are a Mac OSX 10.8 or later, you need to make sure your version
of Python is up-to-date. We strongly recommend adopting the free
Anaconda Scientific Python distribution
as we had the best success with this, and it includes everything we need
except pyds9.
The current public version of modsView is v2.1.7 (2019 Nov 24), now
distributed on GitHub:
- modsView (GitHub)
And follow the instructions in the readme file.
You can download directly from GitHub from your terminal shell if your computer
has git installed (it should if a modern computer, Linux or Mac):
git clone https://github.com/rwpogge/modsView.git
If you have previously installed modsView from GitHub, you can update it
by typing
    cd /path/to/wherever/you/put/modsView
    git pull origin master
This won't work unless you installed it using the git clone method above.
Before you can use modsView, you must have DS9, the xpa tools, and
pyds9 installed and tested on your system. To see if pyds9 has been
installed in your local Python, type:
   % python
   Python 2.7.9 |Anaconda 2.1.0 (64-bit)| (default, Dec 15 2014, 10:33:51)
   [GCC 4.4.7 20120313 (Red Hat 4.4.7-1)] on linux2
   Type "help", "copyright", "credits" or "license" for more information.
   Anaconda is brought to you by Continuum Analytics.
   Please check out: http://continuum.io/thanks and https://binstar.org
   >>> import ds9
   >>>
If it returns any errors with the last command, (e.g., "ImportError:
No module named ds9"), then try
   >>> import pyds9
   >>>
When pyds9 migrated from SAO to github for distrubtion, they changed the
module name but did not provide a back-compatibility option.
However, if neither works, then pyds9 is not installed (or you have a
Python path to locally-installed modules defined incorrectly),
modsView reads a MODS target acquisition (.acq) or imaging (.img)
script and then opens a custom DS9 window named "modsView" to display
the target field, markes guide star, draws a MODS focal plane overlay,
and marks NOMAD1 stars in the field.
   Usage: modsView [options] modsScript [fitsFile]

   Where:
     modsScript is a MODS .acq or .img script
     fitsFile  optional: use this FITS image with a WCS instead of DSS

   Options:
     --mms mmsFile overlay slits from an MMS multi-object mask file
     --shadow    overlay the guide probe pickoff shadow region (default: no shadow)
     --finder    create a PNG finder chart
     --grid      overlay celestial coordinate grid (default: no grid)
     --rotate    rotate to fixed-MODS orientation (default: N=up/E=left)
     --noalign   do not align the DSS image to N=up/E=left, default: align
     --size s    change the size of the image to s arcmin (default: 12 arcmin)
     --cat catID use catalog catID, options: nomad, ub1 or ua2 (default: nomad)
     --nocat     do not overlay catalog stars
     --keepcat   do not delete star catalog working files (default: delete catalogs)
     --find      Print a list of candidate guide stars to select from
     --minmag x  specify the catalog faint magnitude limit. default: 16.5
     --maxmag x  specify the catalog bright magnitude limit, default: 11.0
     --server x  image server to use, must be one of stsci or eso, default: stsci
     --survey x  sky survey to use, must be valid for server
                   defaults: stsci=all, eso=DSS2-Red
     --nolabel   do not label the image with OBJNAME
     --nodisp    only print the analysis and quit without displaying in ds9
     --kill      kill any delinquent/hidden modsView ds9 window and exit
      -V         print version info and exit

   See the DS9 manual for server/survey options
Each of these options are described in the following sections.
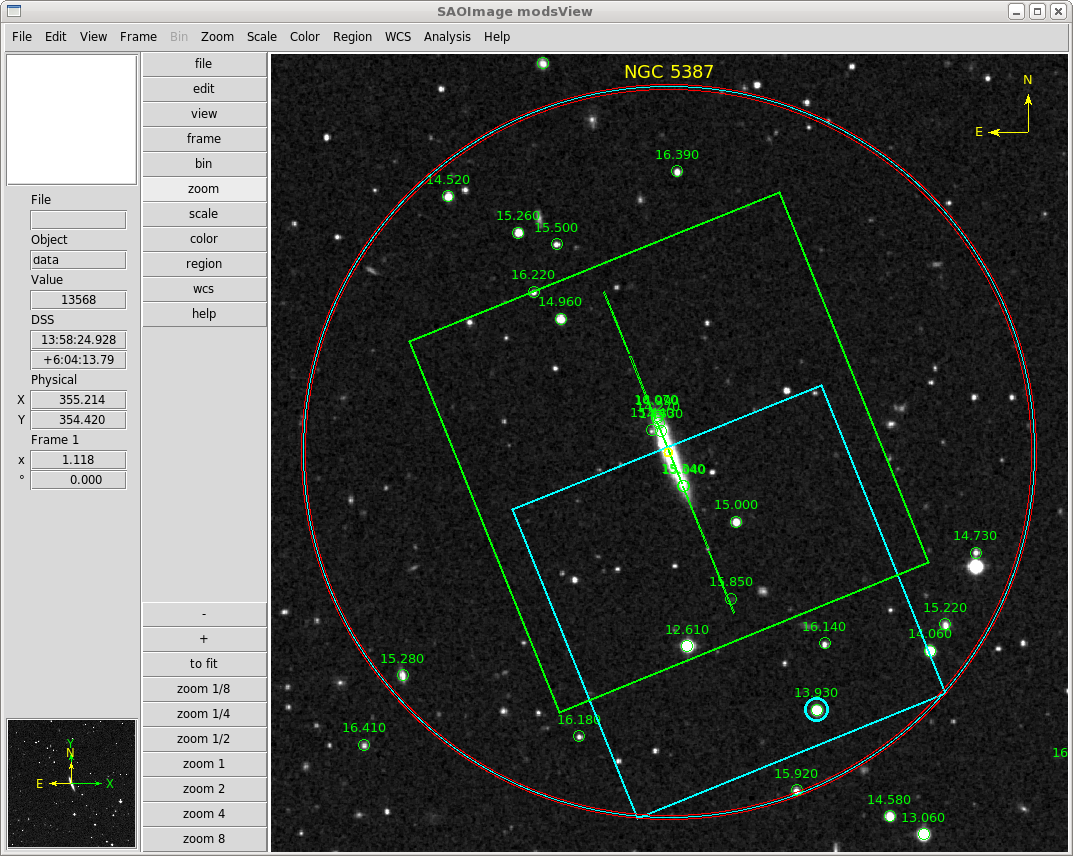
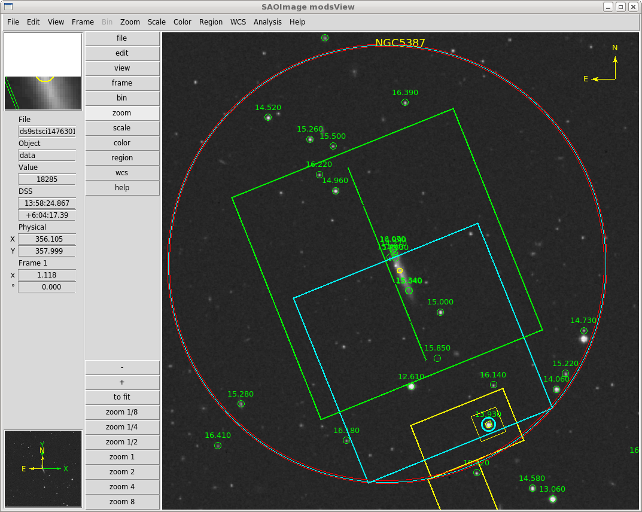
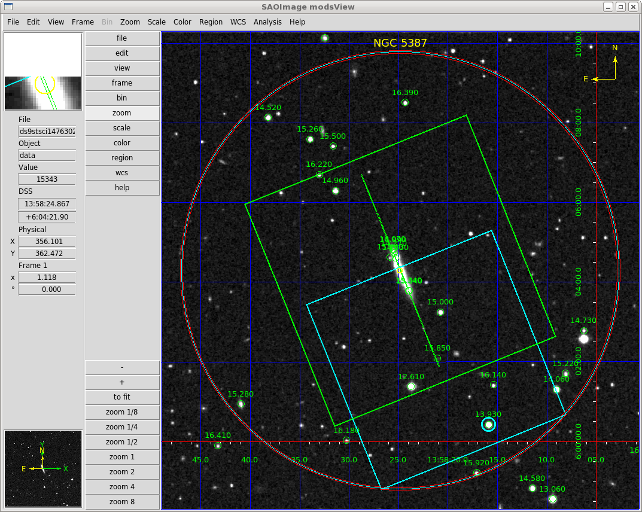
To view a MODS acquisition (.acq) or imaging (.img) script, you would type
modsView ngc5387.acq
This will launch a custom DS9 window, retrieve an image of the field from the
Digitized Sky Survey (DSS) server at STScI, and then
- Draws the MODS science field as a green box. If using one of the facility
long-slit masks, it will draw the slit(s).
- Draws the MODS AGw unit guide patrol field as a light blue box.
- Marks the preset target coordinates with a yellow circle.
- Marks the guide star with a red circle
- Searches the NOMAD catalog for the field and plots catalog stars labeled
with their R-band magnitudes.
- Draws a circle delimiting the full instrument rotator sweep on the field.
- Draws a compass to indicate the image orientation (North/East)

The default size of the DSS image is 12x12-arcminutes. We've modified
the appearance of DS9 to make the modsView window look distinct from a
default DS9 instance (e.g., as might be used by IRAF).
Before making the plot, it prints a summary of the targeting
information and verifies that your guide star is inside guide patrol
field at the selected instrument rotator angle. For example:
   % modsView ngc5387.acq

   MODS .acq Script: ngc5387.acq

   Summary:
         Object: NGC 5387
         Coords: 13:58:24.8 +06:04:17
     Rotator PA: 22.0 deg
     Guide Star: 13:58:15.871 +06:00:25.24
     AGw Filter: Clear
      Slit Mask: LS5x60x1.0
    Acquisition: Red Camera, r_sdss Filter, Exp=30.0 sec

   Guide Star Check:
     The guide star is inside the MODS patrol field after the telescope preset.

   Displaying MODS sky view:
     Downloading DSS image from the server...
     Plotting NOMAD1 catalog stars with their R magnitudes...
     Magnitude Range: 16.5 < R < 11.0

   Guide Star Catalog Info:
     Star ID: NOMAD1 0960-0232655
      Coords: 13:58:15.88 +06:00:25.14
        Phot: R=13.93 B=14.11
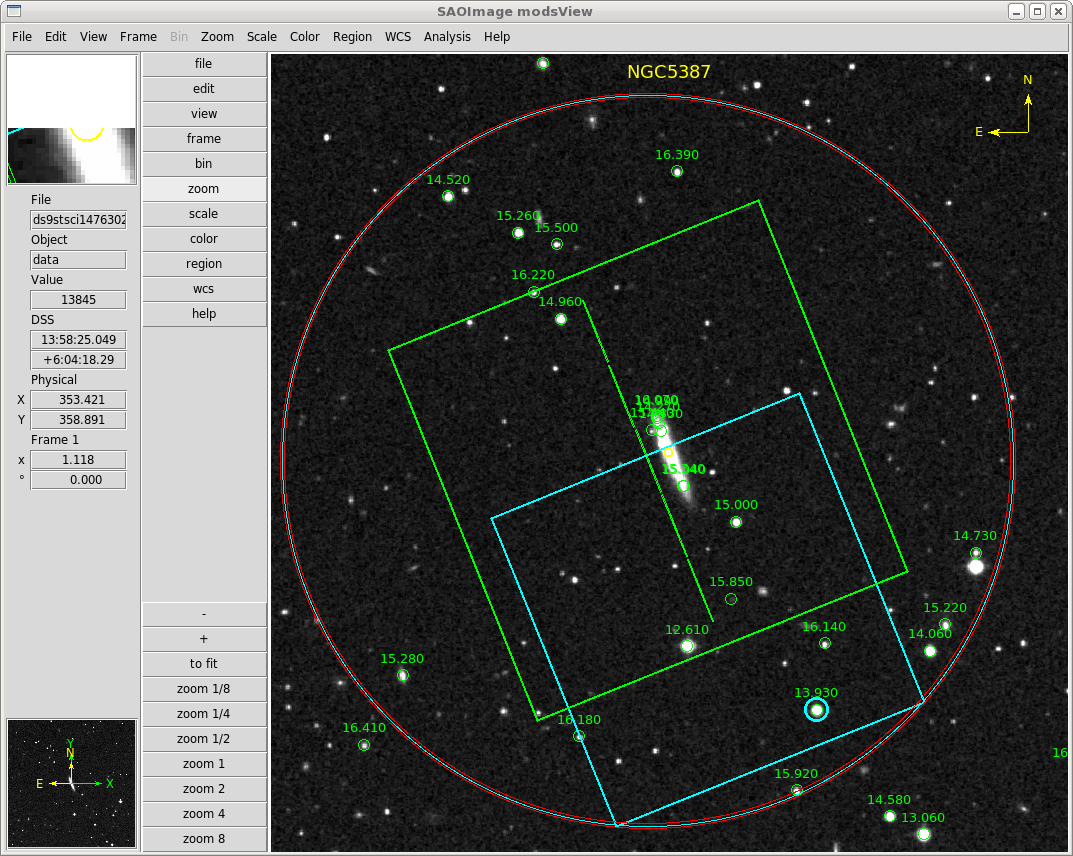
If your acquisition script includes an offset after the telescope
preset, modsView will verify that the guide star is still inside
the AGw patrol field after the offset. The final offset position will be
drawn over the DSS image with the original "aim point" for the script
drawn as a yellow circle so you can see the offset. For example:

The report includes the offset requested and post-offset guide-star checks:
   % modsView.py  ngc5387_spec3.acq

   MODS .acq Script: ngc5387_spec3.acq

   Summary:
         Object: NGC5387
         Coords: 13:58:24.8 +06:04:17
     Rotator PA: 22.0 deg
     Guide Star: 13:58:15.871 +06:00:25.24
     AGw Filter: Clear
      Slit Mask: LS5x60x1.0
    Acquisition: Red Camera, r_sdss Filter, Exp=30.0 sec
   DETXY Offset: dX=20.50 arcsec dY=0.00 arcsec type=rel

   Guide Star Check:
     The guide star is inside the MODS patrol field after the telescope preset.
     The guide star is inside the MODS patrol field after OFFSETXY.

   Displaying MODS sky view:
     Downloading DSS image from the server...
     Plotting NOMAD1 catalog stars with their R magnitudes...
     Magnitude Range: 16.5 < R < 11.0

   Guide Star Catalog Info:
     Star ID: NOMAD1 0960-0232655
      Coords: 13:58:15.88 +06:00:25.14
        Phot: R=13.93 B=14.11
If you want to see what parts of the field are shadowed by the AGw pickoff
mirror and actuator arm, you would use the --shadow option:
% modsView ngc5387_spec3.acq --shadow
The nominal MODS guide probe shadow regions are drawn in yellow:
See below for more details on how the guide probe
shadow is represented.
If you just want to check the guide star and print summary info without
viewing the field in DS9, you would type:
% modsView ngc1234_field2.acq --nodisp
Finall, to get quick help, type
% modsView
without arguments. This will show the usage
message, providing a quick summary of the command syntax and the
various command-line options available.
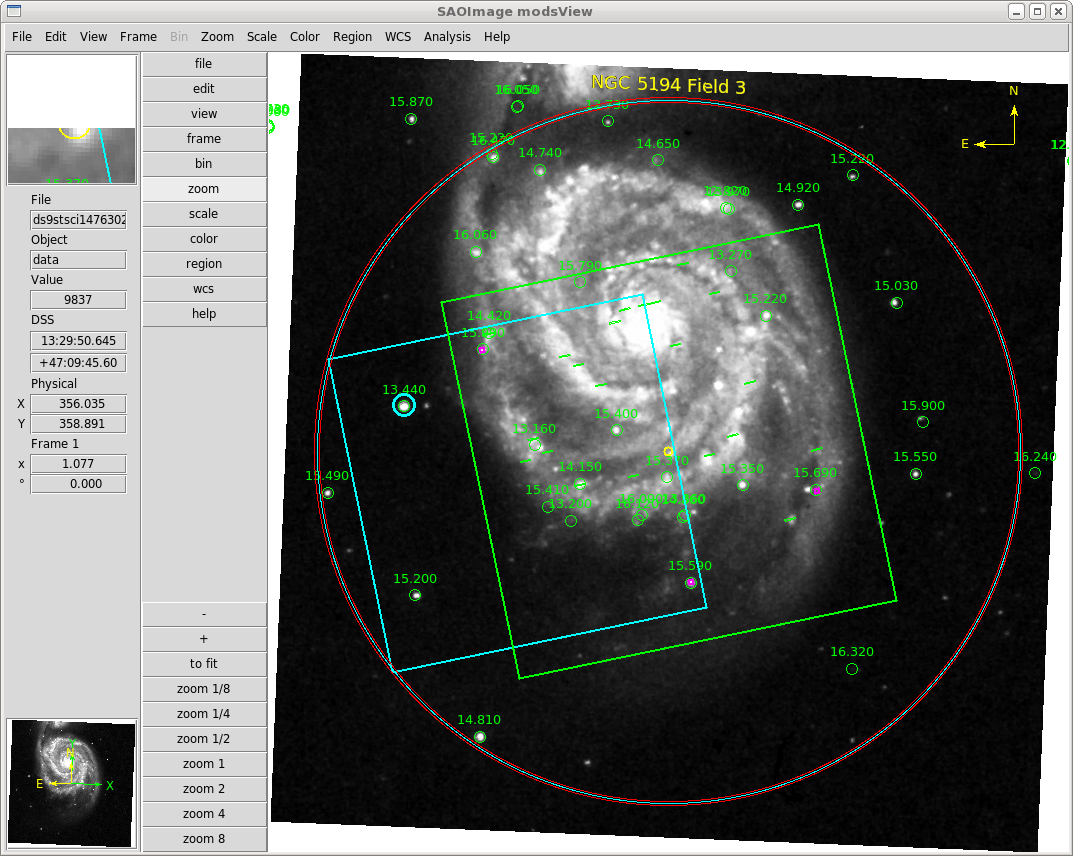
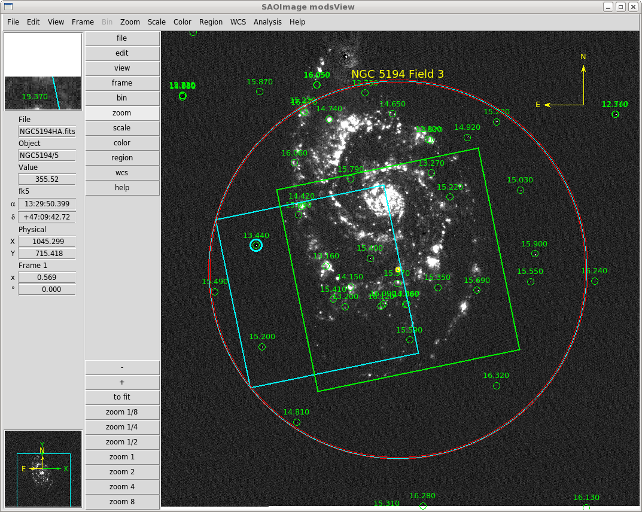
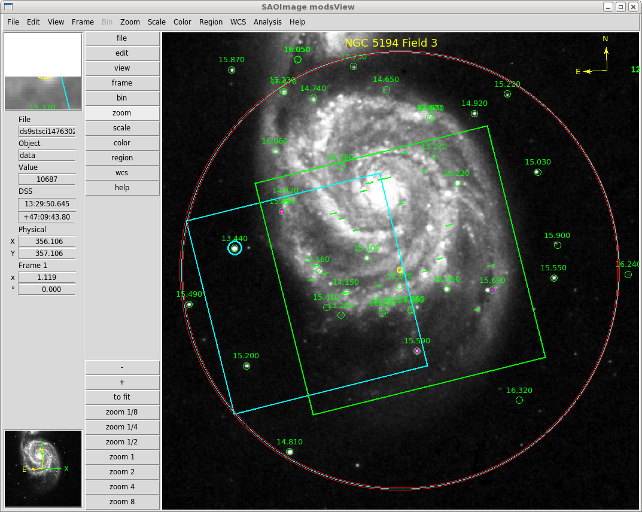
By default modsView displays a DSS image of the field. If you
yhave a FITS image with a valid precision World Coordinate System
(WCS) astrometric solution in the image header, you can use that image
instead of a DSS image.
For example:
modsView NGC5194_3.acq NGC5194HA.fits
Will use FITS image NGC5194HA.fits as the background image
and draw the overlay on that.
Some provisos when using this option:
- The image must have a valid WCS. If no astrometric solution is embedded
in the FITS header, this option will produce bad results.
- You will need to adjust the intensity scaling and zoom factors used
to get the display to look nice using the Scale and Zoom
buttons on the DS9 window.
- If you want to make a finder chart, you will have to do the finder export
by hand using the File, Save Image... menu options in the
DS9 window.
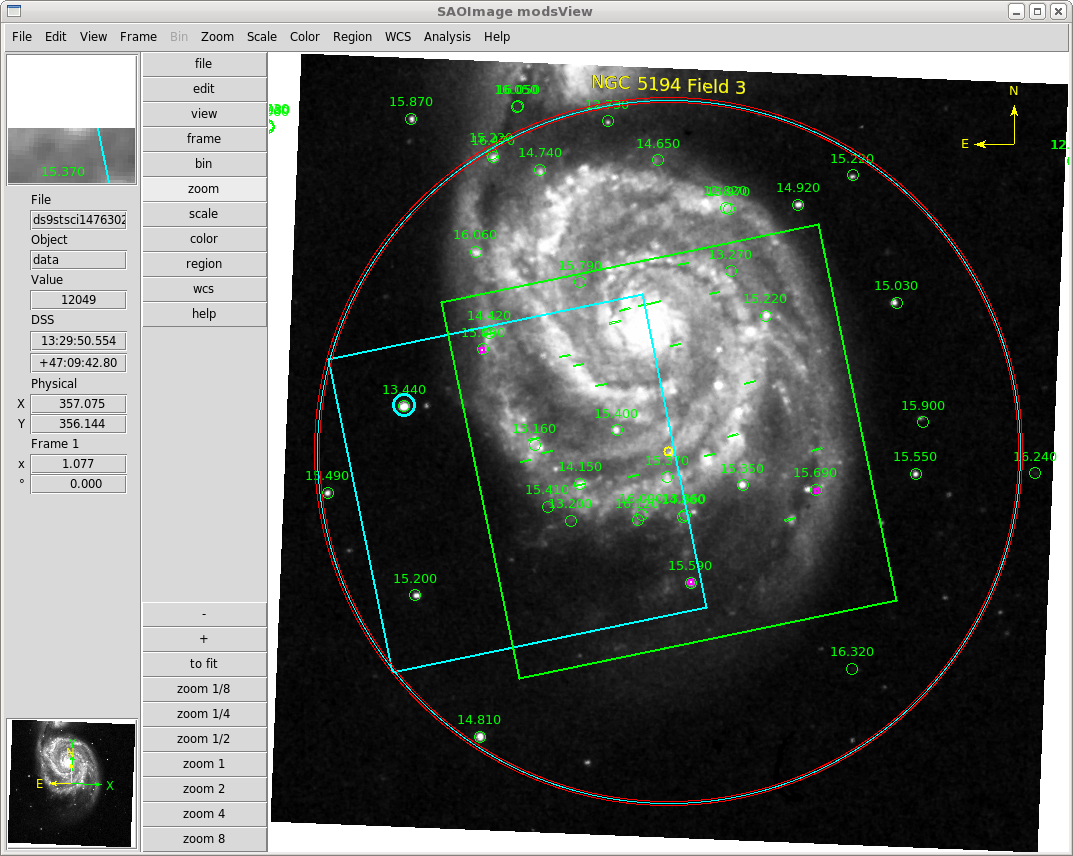
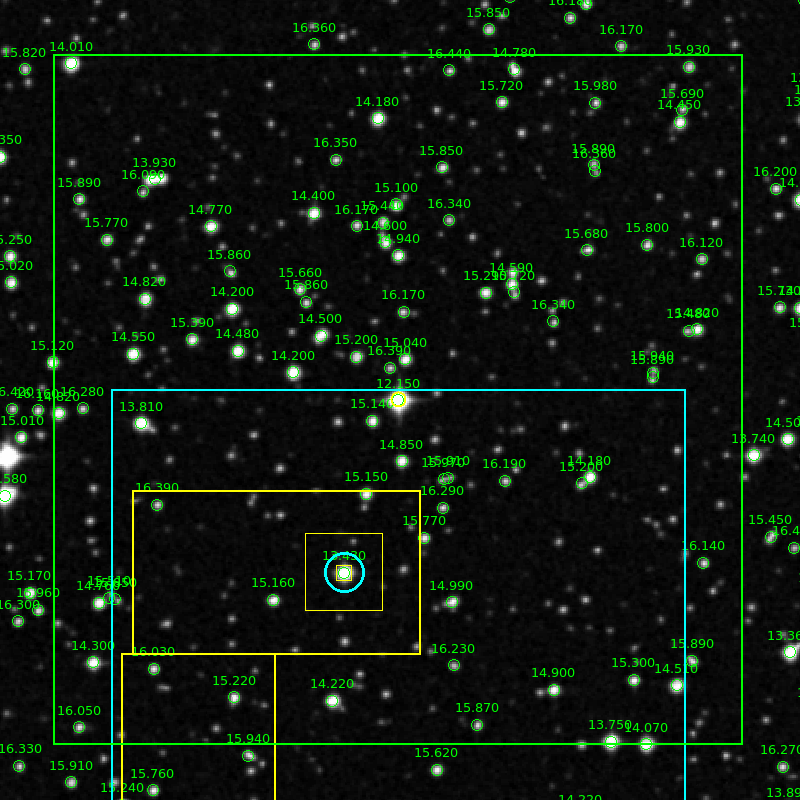
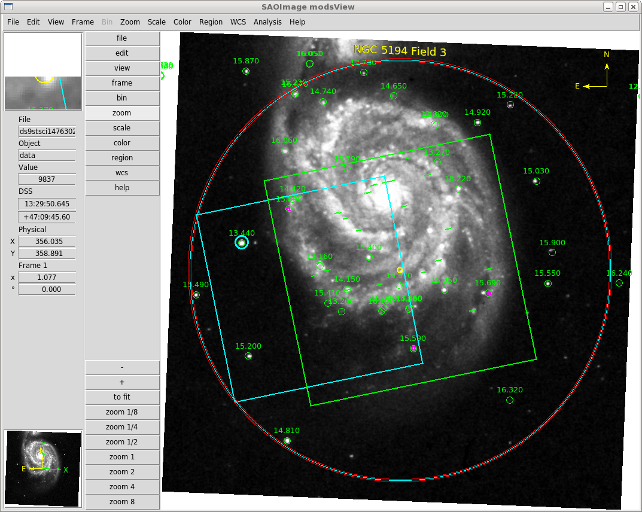
If the target acquisition script is for multi-object spectroscopy
target, the --mms option will overlay the alignment star
and target slits. You need to have the MMS file used to create the
slit mask (since you need this file to run modsAlign at the telescope,
you should have it anyway).
For example:
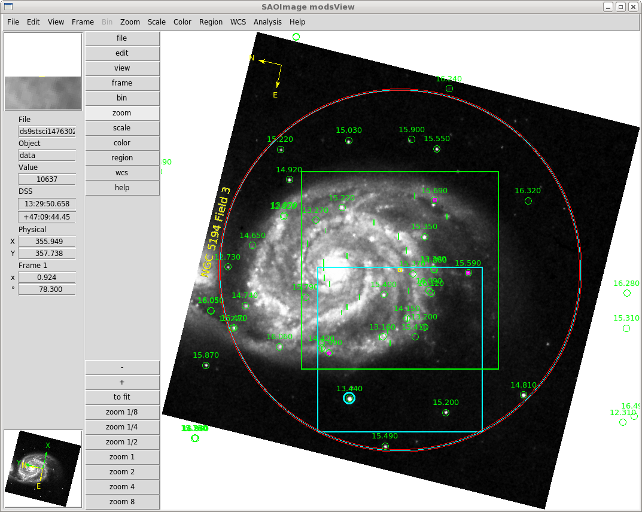
modsView NGC5194_3.acq --mms NGC5194_3.mms
Will draw the MODS focal plane and the multi-object mask slits over
a DSS image of the field:
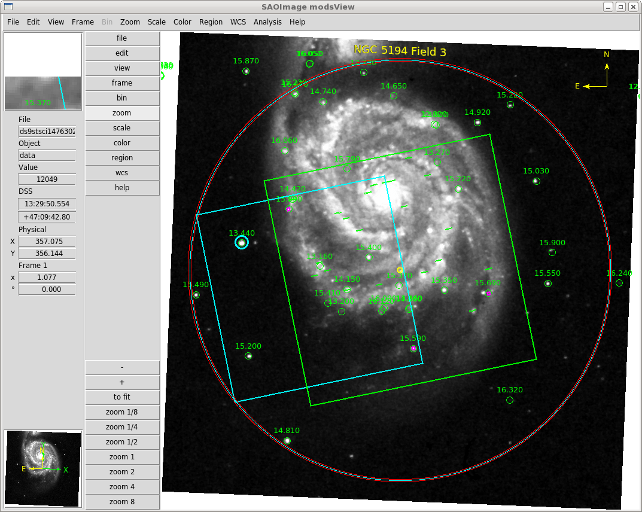
The alignment star boxes are drawn in magenta, while the target slits are drawn
in green. These are all drawn actual size.
One utility of this option is to check a mask design to make sure you
haven't put very bright stars in the alignment boxes. In this case,
one of the alignment stars (just above center) is 12.7 mag, which
would saturate a 60-second acquisition image.
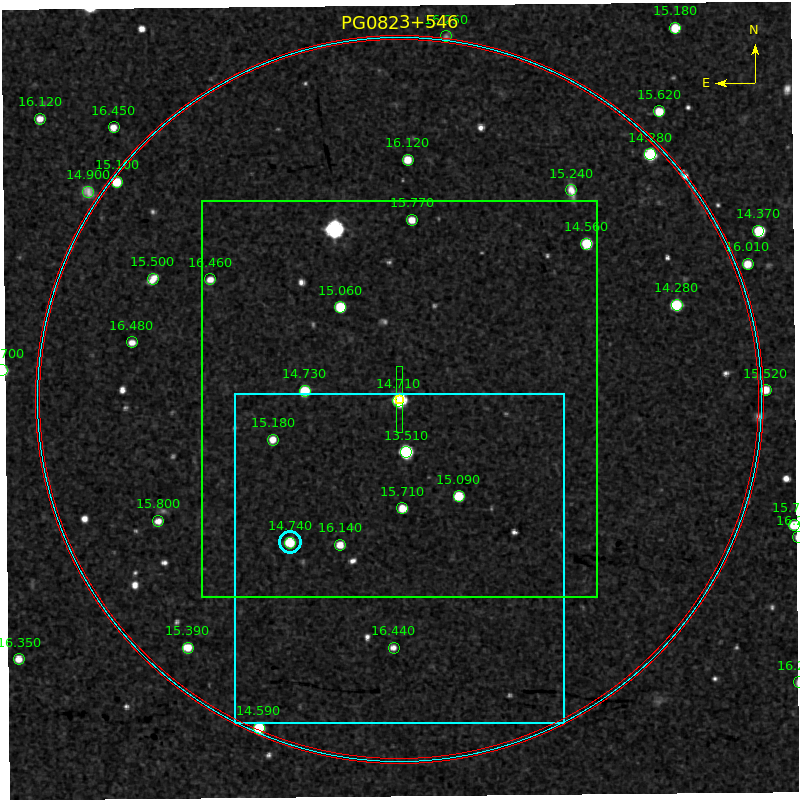
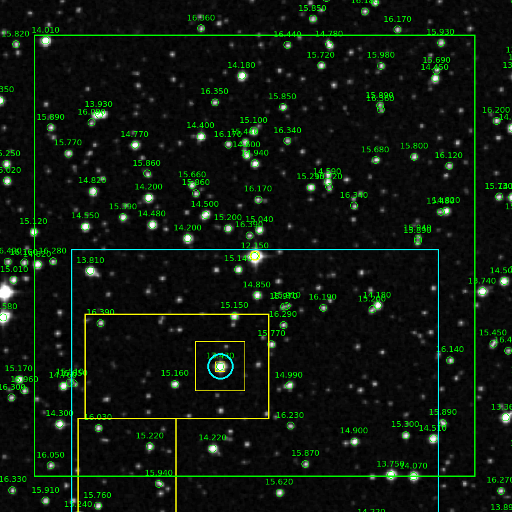
The -f/--finder option will create a PNG-format finding
chart of the field. The name of the finder includes the acquisition
or imaging script name. For example:
% modsView pg0823.acq --finder
will create a PNG file named pg0823.png with the MODS field
overlaid.
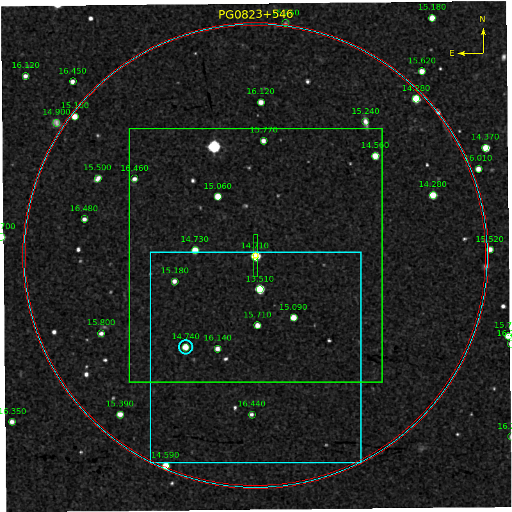
The finder is oriented in the conventional way: North=Up, East=Left.
A direction compass is plotted in the upper right-hand corner. In this
particular example, the acquisition script was for a
spectrophotometric standard star to be observed with the
60x5-arcsecond calibration mask slit. The label at the top center is
derived from the OBJNAME parameter in the .acq file.
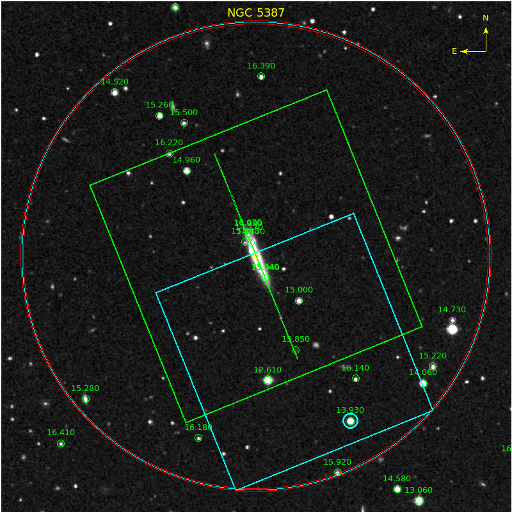
The --shadow option will overlay a representation of the
nominal guide probe shadow. The shadow region is drawn in yellow.
The picture below is a representation of this field created using
modsView and the --shadow option with a MODS acquisition
script:
The shadow regions are a conservative representation of the actual MODS
probe shadow intended to provide basic guidance to avoid occulting
the long-slit masks with the guide probe. A more detailed rendering
of the shadow is beyond the basic graphic capabilities provided by DS9.
The intent is to provide guidance as to when a particular choice of guide star
will block light from getting into part of a slit (the guide probe is
located above the slit mask). In some cases, occultation of an
unused part of the slit is acceptable in order to use a suitable guide
star for an observation, but in all cases when you are close to the slits,
you should use --shadow to evaluate how it might block your
targets.
By default, modsView uses the
NOMAD1 catalog to display stars. R magitudes
between default limiting magnitudes of 16.5<R<11.0 mag are shown.
These limits can be changed using the --minmag and
--maxmag options:
% modsView ngc1234.acq --minmag 15 --maxmag 12
For example, this combination of command-line options instructs modsView
to only display stars between R=12 and R=15 mag. In this context, "min" means
faint, and "max" means bright.
You can also elect to select on B magnitudes, e.g., when doing acquisitions
of very blue targets in blue-only mode and selecting the B_Bessel filter
for the guide camera.
% modsView --agwfilt b
Note, however, that if your acquisition script already has the
AGWFILT parameter set to to B_Bessel, modsView will automatically selects
B instead of R magnitudes.
You can also change the star catalog used with the -c/--catalog
option. For example:
% modsView ngc1234.acq --catalog ub1
uses the USNO-B1 catalog. At present we support three star catalogs:
- nomad = NOMAD1 -
a simple merge of data from the Hipparcos, Tycho-2, UCAC-2, and USNO-B1
catalogues supplemented with 2MASS final release point-source photometry.
- ub1 = USNO-B1.0 Catalog
(Monet et
al. 2003), a 3-color, 2-epoch catalog that provides all-sky coverage
down to V=21 at 0.2"e; accuracy and 0.3mag photometric accuracy.
- ua2 = USNOA2.0 - earlier USNO 2-color, 1-epoch catalog, now
superceded by USNO-B1.
These default catalog is NOMAD1 which is the most complete catalog
compilation and has sufficiently accurate photometry for selecting
guide stars.
Finally, you can suppress plotting any stars by using the
--nocat option:
% modsView ngc1234.acq --nocat
This option has no effect guide star checking.
If you have a script with no guide star, or with a dubious guide
star (e.g., too faint, outside the guide patrol field, in the vignetting
region, etc.), you can use modsView to get help selecting a
guide star with the --find option:
% modsView ngc1234.acq --find
This will take the target coordinates and rotator position angle
from the acq script and print a list of candidate guide stars
selected from the NOMAD1 (or specified) star catalog that satisfy
the following criteria:
- Within the magnitude limits (default or specified with --minmag/maxmag)
- In the LUCI guide patrol field at this rotator position angle
- Not inside either the science field or the recommended guide probe
vignetting avoidance region (shown in yellow on modsView).
All stars that meet this criteria are listed by number (order in the
star catalog excerpt loaded from the catalog server) along with the ID,
coordinates, and R and B magnitudes. For example:
Searching the NOMAD1 catalog excerpt for candidate guide stars...

Found 7 candidates:
  Star     ID           RA          Dec        R     B
  -------------------------------------------------------
   30  1193-0159140 07:51:30.15 29:18:06.88 12.21 14.90
   27  1193-0159095 07:51:12.41 29:20:21.33 12.86 14.77
   29  1193-0159123 07:51:21.66 29:19:23.22 13.09 17.91
   61  1192-0161961 07:51:12.60 29:17:38.77 13.42 15.12
   31  1193-0159142 07:51:30.96 29:18:24.48 15.17 16.61
   26  1193-0159094 07:51:12.31 29:19:38.30 15.40 14.23
   28  1193-0159118 07:51:18.85 29:18:36.59 15.99 13.52
  -------------------------------------------------------
Select a guide star (0 to abort):
At the prompt, enter the star number to select (e.g., 30), or 0
to quit selection. On selecting the star, it will be circled in
cyan and the stub of script code needed for this start will
be printed in your terminal screen to cut and paste into
your acquisition script. For example, selecting star 30 above
would print:
Select a guide star (0 to abort): 30

Guide Star Selection:

  GUINAME NOMAD1 1193-0159140
  GUICOORDS 07:51:30.15 +29:18:06.88 # R=12.21 B=14.90

Selection OK <y|n>?
Answering y will complete guide-star selection and exit
modsView. Answering n will repeat the selection prompt, but
not redisplay the table of choices. This will let you try out a number of possible
guide star choices without having to re-run the program.
Note that we do not automatically select a guide star because
there is an irreducible element of user judgement that must
come into play.
By default, modsView uses the Digitized Sky Survey (DSS) image server
at the Space Telescope Science Institute (STScI) in Baltimore
Maryland. The standard DS9 default survey of "all", which means it
lets the STScI server deliver the best image it has from among the
various survey options, which is usually the red POSS2 image.
European LBT partners may wish instead to use the DSS images server at ESO
in Garching:
% modsView ngc1234.acq --server eso
Will use the ESO image server and the DSS2-red survey. This is the
closest match (visible from LBT) of the default images delivered by
STScI.
You can change the sky survey image source with the
--survey keyword.
Options are:
- STScI:
- all - pick the best [default]
- poss2ukstu_red = POSS2 UK Schmidt Red Plates
- poss2ukstu_blue = POSS2 UK Schmidt Blue Plates
- poss2ukstu_ir = POSS2 UK Schmidt IR Plates
- poss1_red = POSS1 (Epoch 1954) Red Plates
- poss1_blue = POSS1 (Epoch 1954) Blue Plates
- ESO:
- DSS1 = POSS1 red plates
- DDS2-red = POSS2 Red Plates [default]
- DSS2-blue = POSS2 Blue Plates
- DSS2-infrared = POSS2 IR Plates
The name convention is that used by the DS9 program.
modsView has a few options for altering the appearance of the image (and finder chart):
- -s/--size N
- Change the size of the DSS image retrieved to NxN-arcminutes.
The default is 12 arcminutes. This option is ignored if displaying
your own FITS image.
- -g/--grid
- Overlay a celestial coordinate grid on the image
- By default no grid is plotted
- --noalign
- Do not orient the image North=Up/East=Left.
- In some parts of the sky the DSS images are rotated relative to the RA/Dec grid,
for example:
- Using the --noalign option supresses the alignment of the image
with the celestial coordinate grid:
- leaving the DSS image oriented in physical pixels. In this view
the N/E compass in the upper right-hand corner indicates the orientation.
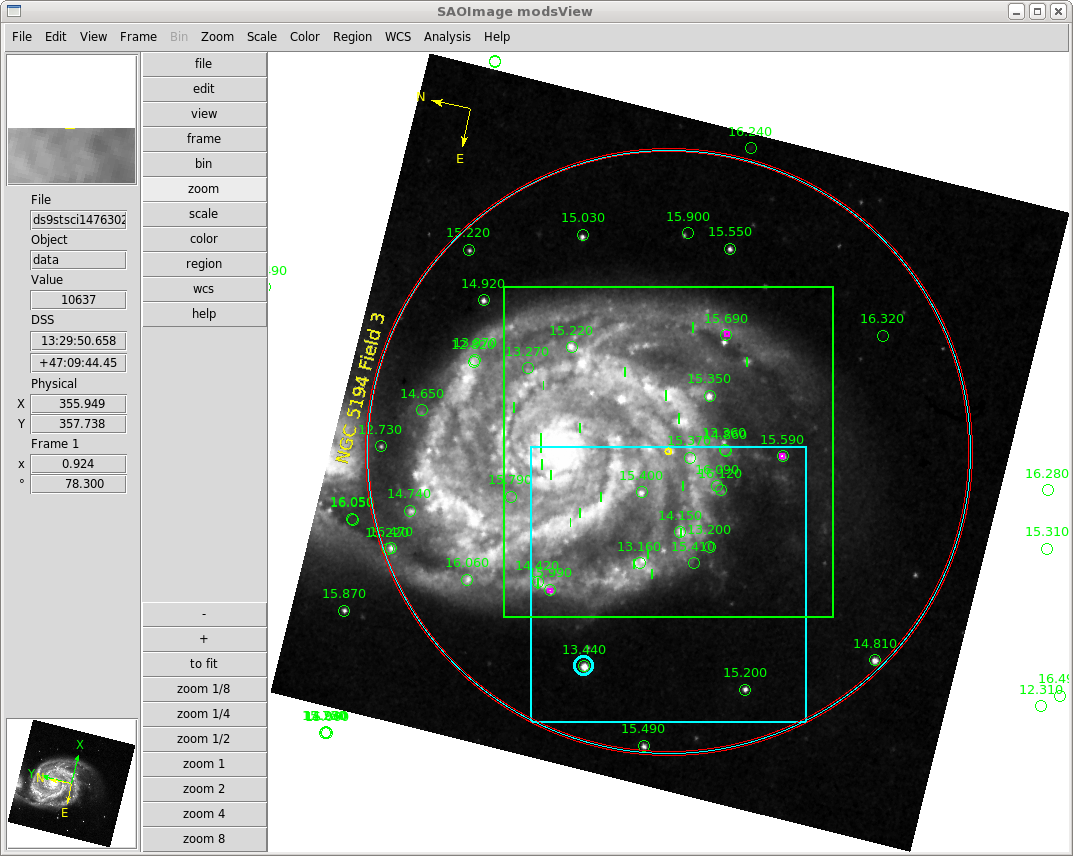
- --rotate
- Rotate the image to a fixed-MODS orientation.
- The default modsView shows the sky with MODS rotated to the
requested instrument PA. --rotate rotates the sky
and leaves MODS fixed. For example:
- This orients the view to be the same as that of MODS science camera images
of the field.
These options control the operation of the modsView program:
- --nodisp
- Will only perform the analysis of the guide star and other syntax checks,
but not display a sky view for finder chart.
- -V/--version
- Print the current version number and date and exit.
- --kill
- Will kill a delinquent or "lost" modsView DS9 window and exit.
Sometimes you iconify and forget it. This lets you kill it and
start over.
modsView works well most times, but there are occasional problems. These
are the most common issues we encountered during testing.
ds9 unable to load DSS image from dssstsci...
There are at least two known causes:
- The field is at or near the southern boundary of the DPOSS
survey.
- For example, this error occured for a target at (RA,Dec)=(15:37,-24:26).
- The solution was to switch to the eso server:
modsView B1514-241.acq --server eso
and it displays fine. The boundary between the northern and southern
survey coverage is ragged, so it is hard to predict when a particular
target will land too close to the last image boundary in the survey.
- The server query times out.
- This sometimes happens if network traffic to the server is high. DS9
waits a maximum time (about 2 minutes) for a response from the image
server at STScI or ESO before timing out. In this case, just repeat
the command.
ds9 unable to display FITS image file NGC1234.fits ...
This is an oddity of DS9. If the modsView DS9 window is already up and
was previously used to only display DSS images, it will fail to load
a user-defined FITS image of any size.
The solution is to kill the modsView DS9 window and send the command again.
After this, you can mix DSS and user FITS images easily. I have no idea
why it does this.
If you encounter any bugs or odd behaviors, please contact Rick Pogge
(pogge.1@osu.edu), and if possible include the MODS
script and any other files (MMS or FITS) as attachments.
If you used modsView in your research work, we ask that you follow emerging
software citation principles being adopted
by the astronomical community to ensure the proper citation of software in scientific publications
by using this registered software Digital Object Identifier (DOI) for modsView:
- DOI 10.5281/zenodo.2550759
which includes a link to a preformatted BibTeX entry you can use if you cite this software.
modsView was developed for the MODS1 and MODS2 instruments at the Large Binocular Telescope
Observatory, which were built with major support provided by grants from the U.S. National
Science Foundation's Division of Astronomical Sciences Advanced Technologies and
Instrumentation (AST-9987045), the NSF/NOAO TSIP Program, and matching funds provided by the
Ohio State University Office of Research and the Ohio Board of Regents. Additional support for
modsView was provided by NSF Grant AST-1108693.
These notes are chronological from most recent to oldest releases.
Older copies of modsView are available below, but we strongly
recommend that you only download the latest
version. This is the version that is installed at LBT.
- Version 2.1.7 (2019 Nov 24) - AGw Patrol Field Update
- Updated the coordinates of the AGw patrol field to a least-common
denominator for MODS1 and MODS2.
- Version 2.1.6 (2018 Sep 05) - Python 3 Fixes
- Some fixes supporting efforts to port to Python 3, still only being testing
on a Mac running MacOS HighSierra and anaconda python 3.6.5, but changes so far
have been benign on python 2.7 systems, so back-compatibility has been preserved.
- Version 2.1.5 (2018 Jul 22) - Compatibility & Bug Fixes
- This is a compatibility and bug fix version that rooted out some otherwise
unnoticed minor bugs that were in the way of running modsView in Python 3. Not
actually a port to Python 3 so much as a few tweaks to run in a back-compatibility
way. Also verified to work on MacOS 10.13 (High Sierra), though your mileage may
vary as always with MacOS.
- Version 2.1.4 (2018 May 15) - Experimental version for SNS tests
- Experimental version that tested a very experimental and not yet ready for
darktime observing mode of MODS we won't repeat soon.
- Version 2.1.3 (2016 Dec 04) - Cosmetic Patch
- This is a patch for version 2.1 that addresses a minor cosmetic
issue in one print statement that elicited comment from some users.
- Version 2.1.2 (2016 Nov 15) - min/maxmag Patch
- This is a patch for version 2.1 that addresses a problem whereby
users could not change the minimum (faint) and maximum (bright)
catalog star magnitudes for display with --minmag/--minmax.
- Version 2.1.1 (2016 Oct 15) - ds9 Patch
- This is a patch for version 2.1 that addresses a problem encountered
by users with an older version of pyds9. While we urge people to
update to the latest version of pyds9, this patch will bridge the gap.
- Version 2.1 (2016 Oct 12) - MAJOR UPDATE
- Version 2 is a major update to support MODS1 and MODS2 binocular
operation starting with LBT Semester 2016B when the MODS1 WFS
pickoff optic was updated so that it is the same as in MOD2.
As a result, there is now no practical distinction between MODS1 and
MODS2 for modsView, but, you should check all pre-2016B MODS1
scripts with modsView to verify that your guide star selections are
still valid with the reconfigured MODS1 guider (MODS2 scripts will
not have this problem).
Previous Versions
- Version 2.0 (2015 Nov 20) - Initial MODS2 support
- Version 2.0 added support for MODS2, and correctly drew the MODS1
and MODS2 guide-probe positions for the different WFS pickoff optics
then in MODS1 and MODS2. After we updated the MODS1 WFS pickoff
optics to be the same as MODS2 in October 2016, this version was
retired, and must numbe used.
- Version 1.6 (2015 Jan 22) - new features
- Added additional interaction to the --find feature for guide star
selection. It now requests you confirm the new guide star choice
or allow you to repeat the selection or abort. This makes
modsView more convenient for initial guide star selection, and at
the telescope. Added some additional script syntax checking - for
example it now requires that OBJNAME and GUINAME have an argument
(at least "None") otherwise it aborts. A blank OBJNAME/GUINAME
will cause an acq script to fail at the telescope.
- NOTE: Version 1.6 is the last release of modsView before
Version 2.0. It only supports MODS1. Use Version 2 to pick
guide stars for MODS1 and MODS2.
- Version 1.4.3 (2014 Feb 23) - bug patch
- Bug found in plotting the guide patrol field that would allow
selection of stars that are outside the AGw stage Y-axis limits
after an offset of ~13mm to put the guide star into the WFS
hotspot. Also found a place where the dimensions of the guide
patrol field had been entered twice and different. This bug patch
Addresses issues encountered at the telescope during engineering
tests that selected guide stars as far as possible away from the
optical axis on UTC 2014 Feb 23.
- Version 1.4.2 (2013 Apr 11) - bug patch
- Allows for the case of MMS files with no + signs on declinations.
While this technically not permitted in well-formatted MMS files,
it can still happen, especially in MMS files that might be altered
by hand. We now test for and allow this case. Also fixed a
hitherto undetected bug in the rendering of the guide probe shadow
under RA/Dec offsets.
- Version 1.4.1 (2013 Mar 19) - bug patch
- Fixed a bug in the offsetting logic that would only have been
apparent in certain RADEC offset combinations at high declinations.
- Version 1.3.4 (2013 Jan 7) - incremental bug patch
- Fixed a bug in --minmag/--maxmag whereby it was possible to give
modsView nonsensical magnitude limits (bright limit fainter than
the faint limit). This condition is now trapped at startup and the
crash-point it causes in findStar() patched.
- Version 1.3 (2012 Dec 19) - feature update and bug patch
- Fixed bugs in instrument view after offsets. Added the ability to
display tilted MOS slitlets with --mms and restored the --rotate
feature. A patch added Dec 19 addresses a minor problem with
python 2.7 with the --find option.
- Version 1.2 (2012 Dec 03) - major release
- Added numerous (mostly transparent) enhancements to
execution. Added --find to print a candidate list of guide
stars to select from, and the NOMAD1 catalog is now the
default star catalog. The AGWFILT value in the acq script
is used to select B magnitudes to display on the finder if
AGWFILT=B_Bessel. The summary report has been expanded to
give more details, including star catalog data (R and B mags)
for the guide star if available. Also fixed a number of bugs,
cleaned up some ds9 setup, and updated the webpages.
- Version 0.6.6 (2012 Jun 10) - incremental bug patch
- Fixes a bug in the display of the guide probe shadow when a blind
RADEC offset is requested in the acquisition script.
- Version 0.6 (2012 May 21)
- Introduces MMS file overlay and user FITS image support, customization of
the DS9 window appearance, and quick fixes for some ugly bugs that snuck
into v0.5. This is the last beta testing release before v1.0 (the full
public version) is launched.
- Version 0.5 (2012 May 20)
- Second beta release. Adds the --shadow option to overlay the
outline of the nominal guide probe shadow and OBJNAME labeling.
- Version 0.4 (2012 May 4)
- First beta release of modsView.
Starting with OSX 10.8 (Mountain Lion) Apple has changed how you
install python and other packages that fall outside the Apple app
ecosystem. We are assuming that if you've been using Python, IRAF,
and other non-Apple apps on Mountain Lion or Mavericks, you already
more about this problem than you wish to and are configured
accordingly. If not, ask your sysadmin for help getting
python, ds9, xpa, et al. installed.
Regarding which Python to use on Mac, we strongly recommend that you
adopt the free Anaconda Scientific Python distribution.
We have found that this distribution addresses nearly
all of the issues that made installing Python on Macs difficult at
best before. You will still have to install pyds9 by hand, but it is much
simpler with Anaconda to get it integrated correctly using the native
"setup.py" script as per the pyds9 installation instructions.
Updated: 2019 Nov 24 [rwp/osu]